Posts

Showing posts from March, 2018

Docrafts Roald Dahl Cards

Image
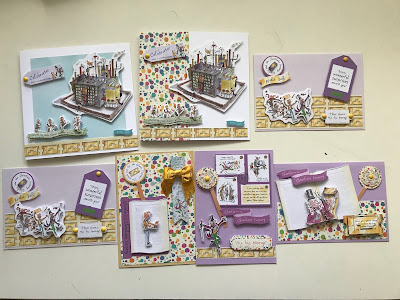
Hi! So I have been searching through all of my old stash again this week, rather than using new goodies, and came across some leftover 'docrafts' kits all centred around Roald Dahl books. I have used some of the 3D decoupage sets and bits and pieces a few years ago, but I had lots of bits left, and a tonne of papers and embellishments, so I decided to make a whole load of themed cards! Do skip to the end and read the names of the products in the supplies list as they are all in fabulous Roald Dahl language! :) Here's the first batch I made up with the 3D decoupage I had left. Charlie and the Chocolate Factory 3D decoupage cards I got seven cards in total from my leftover 3D decoupage which was all Charlie and the Chocolate Factory themed, and I still had a few bits left for some more cards, quite amazing when it looked like this to start with! All the 3D decoupage I used on these cards I tend to lay out the papers and bits I intend to use on each card before

Unicorn, Pegasus and Horse Cards.

Image
Hi! I made 12 cards in total with the unicorn, Pegasus and horse stamps I had cut out and coloured, three of each of the four designs below, with the colours varying slightly. First up I used a film strip die, this is a generic one I got from amazon, with the smaller unicorns, along with a stamp that was part of a 'Fairy Wishes' Embossing folder and stamp set that was a magazine freebie. Simple layout, can be used with lots of images. More unicorns, horses and Pegasus now with The Greeting Farm 'Magical Friends' stamps. I used the same types of layouts as I used with my mermaid cards, with windows and panels, this time I used a generic rainbow die, also from amazon, again cut from white card and coloured with alcohol markers, and some cloud dies that are from the X-Cut Around the World die set. The 'Be a unicorn...' stamp is from Hunkydory's For the love of... Stamps 'Unicorn Dreams' set and the 'Hoping your day

Mermaid Cards, Cake Toppers and Badge

Image
Hi! As promised, I did finally get around to using all of the unicorns and mermaids I made during my Scan N Cut tests! Well, not quite all, I still have a few left in a bag ready to colour, and one or two coloured ones as well, but I have used a lot of them! My youngest daughter adored the mermaids, so one of the cards was personalised with her name and age for her 10th birthday yesterday! Here's some of the cards, I made nine in total, three of each design, with differing hair colours etc. for the mermaids: Both using a window Using a panel from the window leftover. For the first two cards I used layering dies with a dotted edge. I cut a panel of white card slightly smaller than my card blank, then used the next to largest die to first cut the window, then I used the largest die with an embossing mat in my die-cutting machine to give me an embossed frame around the window. The cut out panel was then used on the third card (and some others you can see in the Unico

Unicorns and Mermaids Stamp, Scan and Cut Update

Image
Hi! So, if you haven't read the first post I did on testing my Brother Scan N Cut, you may want to go back a few posts and read it before this one, as this might not make much sense without having read the other one.... As I said in my previous post, I was going to do some further tests, using the same stamp set-up and some more settings fiddled with on my Scan N Cut, so here we go! First thing I did was find the calibration setting for the Scan N Cut as I felt it was a bit out with the cut lines anyway - I just did a quick google search and YouTube lead me to the Brother video showing how to do this! I was right, and it was out by a good few millimetres, so was worth doing! I coloured in another set of the same stamps (exactly the same set up as I had left them in my MISTI stamping tool), this time using Memento Tuxedo Black ink, which is supposed to be alcohol pen friendly, and less likely to bleed if soaked with alcohol pen. My colouring wasn't perfect, I had done it