Embossing folder inked background cards
Hi,
Today I am sharing some photos of quick cards I made using embossing folders and inks to make quick backgrounds. I made a batch of backgrounds after watching a Jennifer McGuire video last week, with no end plan of what my cards would be. Feel free to head over to her blog to see how to do the technique if you don't know it.
Here's the batch of cards I ended up with
Here's all the backgrounds I made, I didn't use quite all of them, but I used all of the larger pieces and a few of the small bits.
The bottom panel on these cards is the centre of the previous card's frames.
Today I am sharing some photos of quick cards I made using embossing folders and inks to make quick backgrounds. I made a batch of backgrounds after watching a Jennifer McGuire video last week, with no end plan of what my cards would be. Feel free to head over to her blog to see how to do the technique if you don't know it.
Here's the batch of cards I ended up with
 |
| 11 cards today! |
 |
| These are all embossing folders I got as freebies with magazines. |
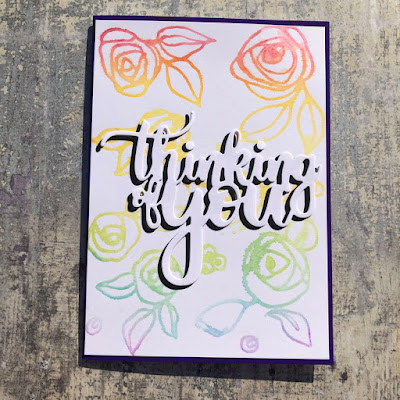
The large 'Thinking of you' card used the whole embossing folder image which I couldn't bare to cut up, so I made a frame for it and placed it on an A5 sized card.
I added a die-cut sentiment raised on foam and a few sequins with the frame raised up on foam tape and I was done.
Next all the yellow cards, this is a 3D embossing folder from Crafters Companion and worked well for the inking technique.
I cut each of the large panels in half and again made frames, adding a die-cut word across the centre that was layered up on foam cut with the same die. I added a little Star Dust Stickles Glitter glue to the white dies on these cards and ended up with four cards.
Next I used the pieces I had cut using sewing frame dies before I embossed them.
The bottom panel on these cards is the centre of the previous card's frames.
I covered the frames with a wood grain effect paper.
I coloured the screw on the frames with a Sakura Metallic Gelly Roll pen and coloured some of the sentiments with the same pen to match, leaving some white. I added some buttons and sequins from my stash, making two of the 'Thank you' cards.
I think the 3D embossing folder worked quite well in the sewing frames, giving the impression of embroidery or lace.
Next I used the Rose panels and decided to trim them down and use the centres on a plain white embossed panel, using a frame to highlight the centre inked image.
I used two different inks from Stampin' Up on these cards, Pink Pirouette and Blushing Bride.
I think I prefer the paler Pink Pirouette, but both came out well. I couldn't bare to cover up the lovely flowers, so I left these card without a sentiment and just added the frame on a foam frame I cut with the same dies and a few sequins and gems.
I hope you liked my cards today.
Lesley x
Bonus Photo
 |
| Craftermath! My messy desk just before I started tidying up and then split a pint of water over it - fortunately I had lifted my finished cards up out of the way to tidy up! |
Supply list
Embossing folders - one is from Crafter's Companion, and the others are magazine freebies that I had lurking in my stash that aren't mark with manufacturers, and I am terrible for not labelling things!
Stampin' Up inks in Pool Party, So Saffron. Pink Pirouette and Blushing Bride
Various dies to create the frames including:
Crafti Potential Stitched Rectangles Fleur de Lis and Dots and Stars
M&C Sticted Rectangle dies
Embroidery Frame dies
Senitment dies
Altenew Thinking of You
Crafti Potential thanks die from the Fleur de Lis set
Tonic Studios Will's Hand happy die
Avery Elle thank you dies from A Tag for All Dies set
X-Cut small Birthday die
Small friend die (I don't know the manufacturer)
Hello die (I don't know the manufacturer)
doCrafts Capsule Elements Wood A5 paper pack
Sakura Metallic Gelly Roll pen in gold
Ranger Stickles glitter glue in Star Dust
Craftwork Cards A6 card blanks (I cut some of these down to fit the US A2 sized Crafti Potential Stitched Rectangle Frames)
Hunkydory A5 card blank
Various buttons, sequins and gems from my stash


Comments
Post a Comment