Hi!
Sorry it's been so long since I did a post, but it's been so hot here in the UK this summer that I have been enjoying the sunshine, and crafting outside a lot, plus with my kids off school it's been tricky finding time to edit videos!
Here's the cards I am going to share with you today.
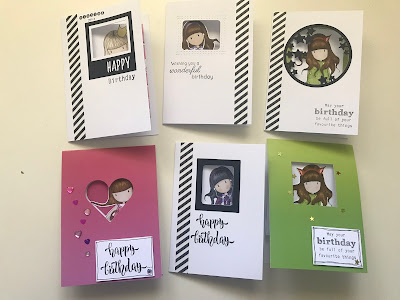 |
| Santoro Gorjuss Cards |
 |
| Sea themed cards |
 |
| Panda Card! |
I have three videos on Window Pop Up cards (because YouTube only allows me 15 minutes at the moment!), inspired by Jennifer McGuire's blog post and video called
Pop-Up Window Cards. If you haven't seen that post or video I highly recommend that you check them out first because I am going to talk about the same types of card, but with reference to UK sized card and where Jennifer McGuire's measurements fit, or don't fit onto standard UK A6 sized card blanks.
Jennifer made four types of pop up cards:
1. Panel pop ups
2. Small strip pop ups
3. Full inner pop ups
4. Top fold pop ups
Part one of my video shows the first two types and a few tips on how to make your panel pop up and strip pop up the right size to fit behind any size panel or cut out shape..
1. Panel Pop Up Cards
Jennifer's measurements: 5
1/2" x 3" score at
3/4", 1
1/2" and 4
1/2"
You can keep these measurements if you are using UK A6 cards! This fits fine, our card are just a little narrower, but this will fit with room to spare.
2. Small Strip Pop Up Cards
Jennifer's measurements:
1/2" x 4
1/4" score at
3/4", 2
3/4" and 3
1/2"
Again you can keep these measurements if you are using UK A6 cards! This is tiny so easily fits our cards, but check out the video as I explain how to make it fit under any size of cut out shape.
Part two of my video shows the second two types of pop up, and tips on how to get the windows in the right place when you already have an image assembled so you need to place your windows accurately on the front of your card.
3. Full Inner Pop Up Cards
Jennifer's measurements: 5
1/2" x 5
1/2" score at
3/4",
4" and 4
3/4"
While This does fit in our UK A6 cards, it is slightly too short, leaving a border top and bottom (when viewed portrait) and a very tight fit once closed, leaving very little space to write a greeting beside the pop up part.
Suggested measurements:5
1/4" x 5
3/4" score at
3/4", 3
3/4" and 4
1/2" (along the shorter side)
This means the whole height of the card is filled (portrait) and there is enough space to write a greeting in vertically down the side, or at the bottom if you are using the card landscape.
4. Top Fold Pop Up Cards
Jennifer's measurements: 6" x 4
1/4" score at
3/4", 4
1/2" and 5
1/4"
This definitely does not fit a UK A6 top fold note card! It is too wide!
Suggested measurements: 6" x 4" score at
3/4", 4
1/2" and 5
1/4"
The score lines are at the same measurements, but our paper is narrower, so we need to make the pop up width 1/4" smaller.
Part three of my video is a look at all the stamp sets, dies and some of the card stock I used to make the cards, so if you saw something you liked, take a look here!
I used three different Santoro Gorjuss stamps on these cards. When I first stamped them I hadn't decided what to make from them, so and had stamped and was colouring them with various alcohol markers from both Trimcraft and ProMarkers ranges. I had also stamped some other, larger stamps which were too big for these cards and I haven't used yet.
 |
| Colouring in progress. |
 |
| Colouring finished! |
 |
| I tried out my colours on this panel. |
 |
| Different hair colours on some of them here. |
I fussy cut out the panel I had tested my colours on, using scissors, leaving a small white border, and used a stitched edge rectangle die to cut the other three out.
Then I simply added them to my window pop up cards using either the panel, strip or top fold styles which you can see in more detail in the videos above.
 |
| Panel style, outside 'Little Song' |
 |
| Panel style, inside 'Little Song' |
 |
| Panel style, outside 'The Fox' |
 |
| Panel style, inside, 'The Fox' |
 |
| Panel style, outside 'My Own Universe' (sorry I gave this the incorrect name on my video!) |
 |
| Panel style, inside 'My Own Universe' |
 |
| Small strip style, outside 'Little Song' |
 |
| Small strip style, inside 'Little Song' |
 |
| Top fold style, outside 'My Own Universe' |
 |
| Top fold style, inside 'My Own Universe' |
This card wasn't on my video, but I finished it, using the final cut out image I had, in the same way as the card above into a top fold pop up card.
 |
| Top fold style, outside 'The Fox' |
 |
| Top fold style, inside 'The Fox' |
My seaside themed cards all used the panel style of pop up, but I wanted to use panels I had made already, rather than placing images behind a window I had already cut, so I needed to work out how to place my windows accurately onto the front of my card.
I show this in my second video, but in case you like words and pictures, this is how I did it! I placed my pop up panel piece, and made-up panel image (in this case the sea horses) onto the front of the card how they would sit with the card shut.
 |
| This shows where I want my dies. |
The pop up piece needs to have the single flap open, and just inside the edge of the card's fold. The double flap needs to be folded flat behind the pop up piece. The panel then sits on top of the pop up piece along the score line. Then place your dies where you want them to sit.
 |
| Hold everything in place! |
Holding everything in place, I lined up a piece of super-sticky post-it note (these are sticky all over rather than just in a strip) with the top corner of my card and stuck my dies to it. I lifted the post-it away with the dies attached.
 |
| Stick the post-it and dies back! |
I then remove the pop up piece and panel and stick the post-it and dies back onto my card with the edges lined up as before, and run this (with the card open of course!) through my die cutting machine. The post-it holds everything in the correct place while I cut and doesn't leave any residue on the card.
 |
| Cut perfectly! |
Then all you need to do is line up your pop up piece and panel on the inside and glue it all together!
 |
| Perfectly peeping seahorses! |
 |
| Seahorse panel style card outside |
 |
| Seahorse panel style card inside |
I used the same method to get the windows in the correct places for my mermaid cards.
 |
| Panel style MFT mermaid outside |
 |
| Panel style MFT mermaid inside |
 |
| Panel style MFT mermaid outside |
 |
| Panel style MFT mermaid inside |
My final card was a panda card using a panda stamp from Stampin' Up. This used the full inner pop up style of card, but in landscape rather than portrait.
 |
| Full Inner pop up style, Party Panda, outside |
 |
| Full Inner pop up style, Party Panda, inside |
This card is going to head to my older daughter's friend who loves pandas and moved to Madrid last year. She is going to add 'Hi Miss You' to the three envelopes herself.
That's it for this mammoth post on Window Pop Up Cards! I hope you found it useful! :)
Lesley x
Supplies are shown in the third video that you will find further up this post.
Bonus photos
My younger daughter insisted on stealing some of the images I had stamped so she could colour them!
Mine weren't coloured when she took hers away, and I didn't see hers until I had coloured mine, but she picked such similar colours that I was amazed!
 |
| She is my blonde daughter, so I was surprised she didn't do a blonde. |
 |
| I think I prefer her yellow boots to my blue ones! |


Comments
Post a Comment